
Washed Suri Fleece
Last year, after shearing, I ended up sending everything to the UK to be processed. It cost a lot of money (you pay for the postage, the processing, the return postage…) I thought it was crazy, but I didn’t know what else to do.
This time I have decided to process the fleece myself. This has opened up a whole new world for me. I have always loved knitting, but to actually create the yarn from raw fleece is an amazing feeling. There’s something very special about spinning too, I think it hotwires you to ancestral DNA!
Processing alpaca fleece is actually quite a long and complicated process. I taught myself using suri fleece which I later learned is very hard to spin, but I seemed to manage OK. I am going to do some huacaya next so will keep you posted on how that compares.
From Fleece to Yarn Here are the stages:
1 skirting. Skirting involves removing long hairs, course or discoloured fleece, second cuts, dirt and “vm” (that’s vegetable matter, yarn making has its own vocabulary you know!) It is best to do this on a skirting table so the dust and stuff can fall on the ground as you work. Being a bit of a DIY fan I have made my own skirting table from an old washing airer and chicken wire. The airer has wonky legs so the table is on a bit of a slope, but hey – the price was right.
2 washing. After watching several YouTube videos (yes, there are videos on how to wash alpaca fleece) I bought a net lingerie washing bag from ebay. The idea is that you put the fleece in that, fill a basin with hot water and handwash, immerse bag for 30 mins don’t swoosh it around too much or it will felt – rinse twice by immersing in hot water, press dry in towel then air dry away from dogs who like to play with fluffy stuff. I have also – shock horror – tried washing the fleece using the wool handwash cycle in the washing machine and it didn’t felt, it was just fine! I think people get a little paranoid about raw fleece felting, so far mine hasn’t.
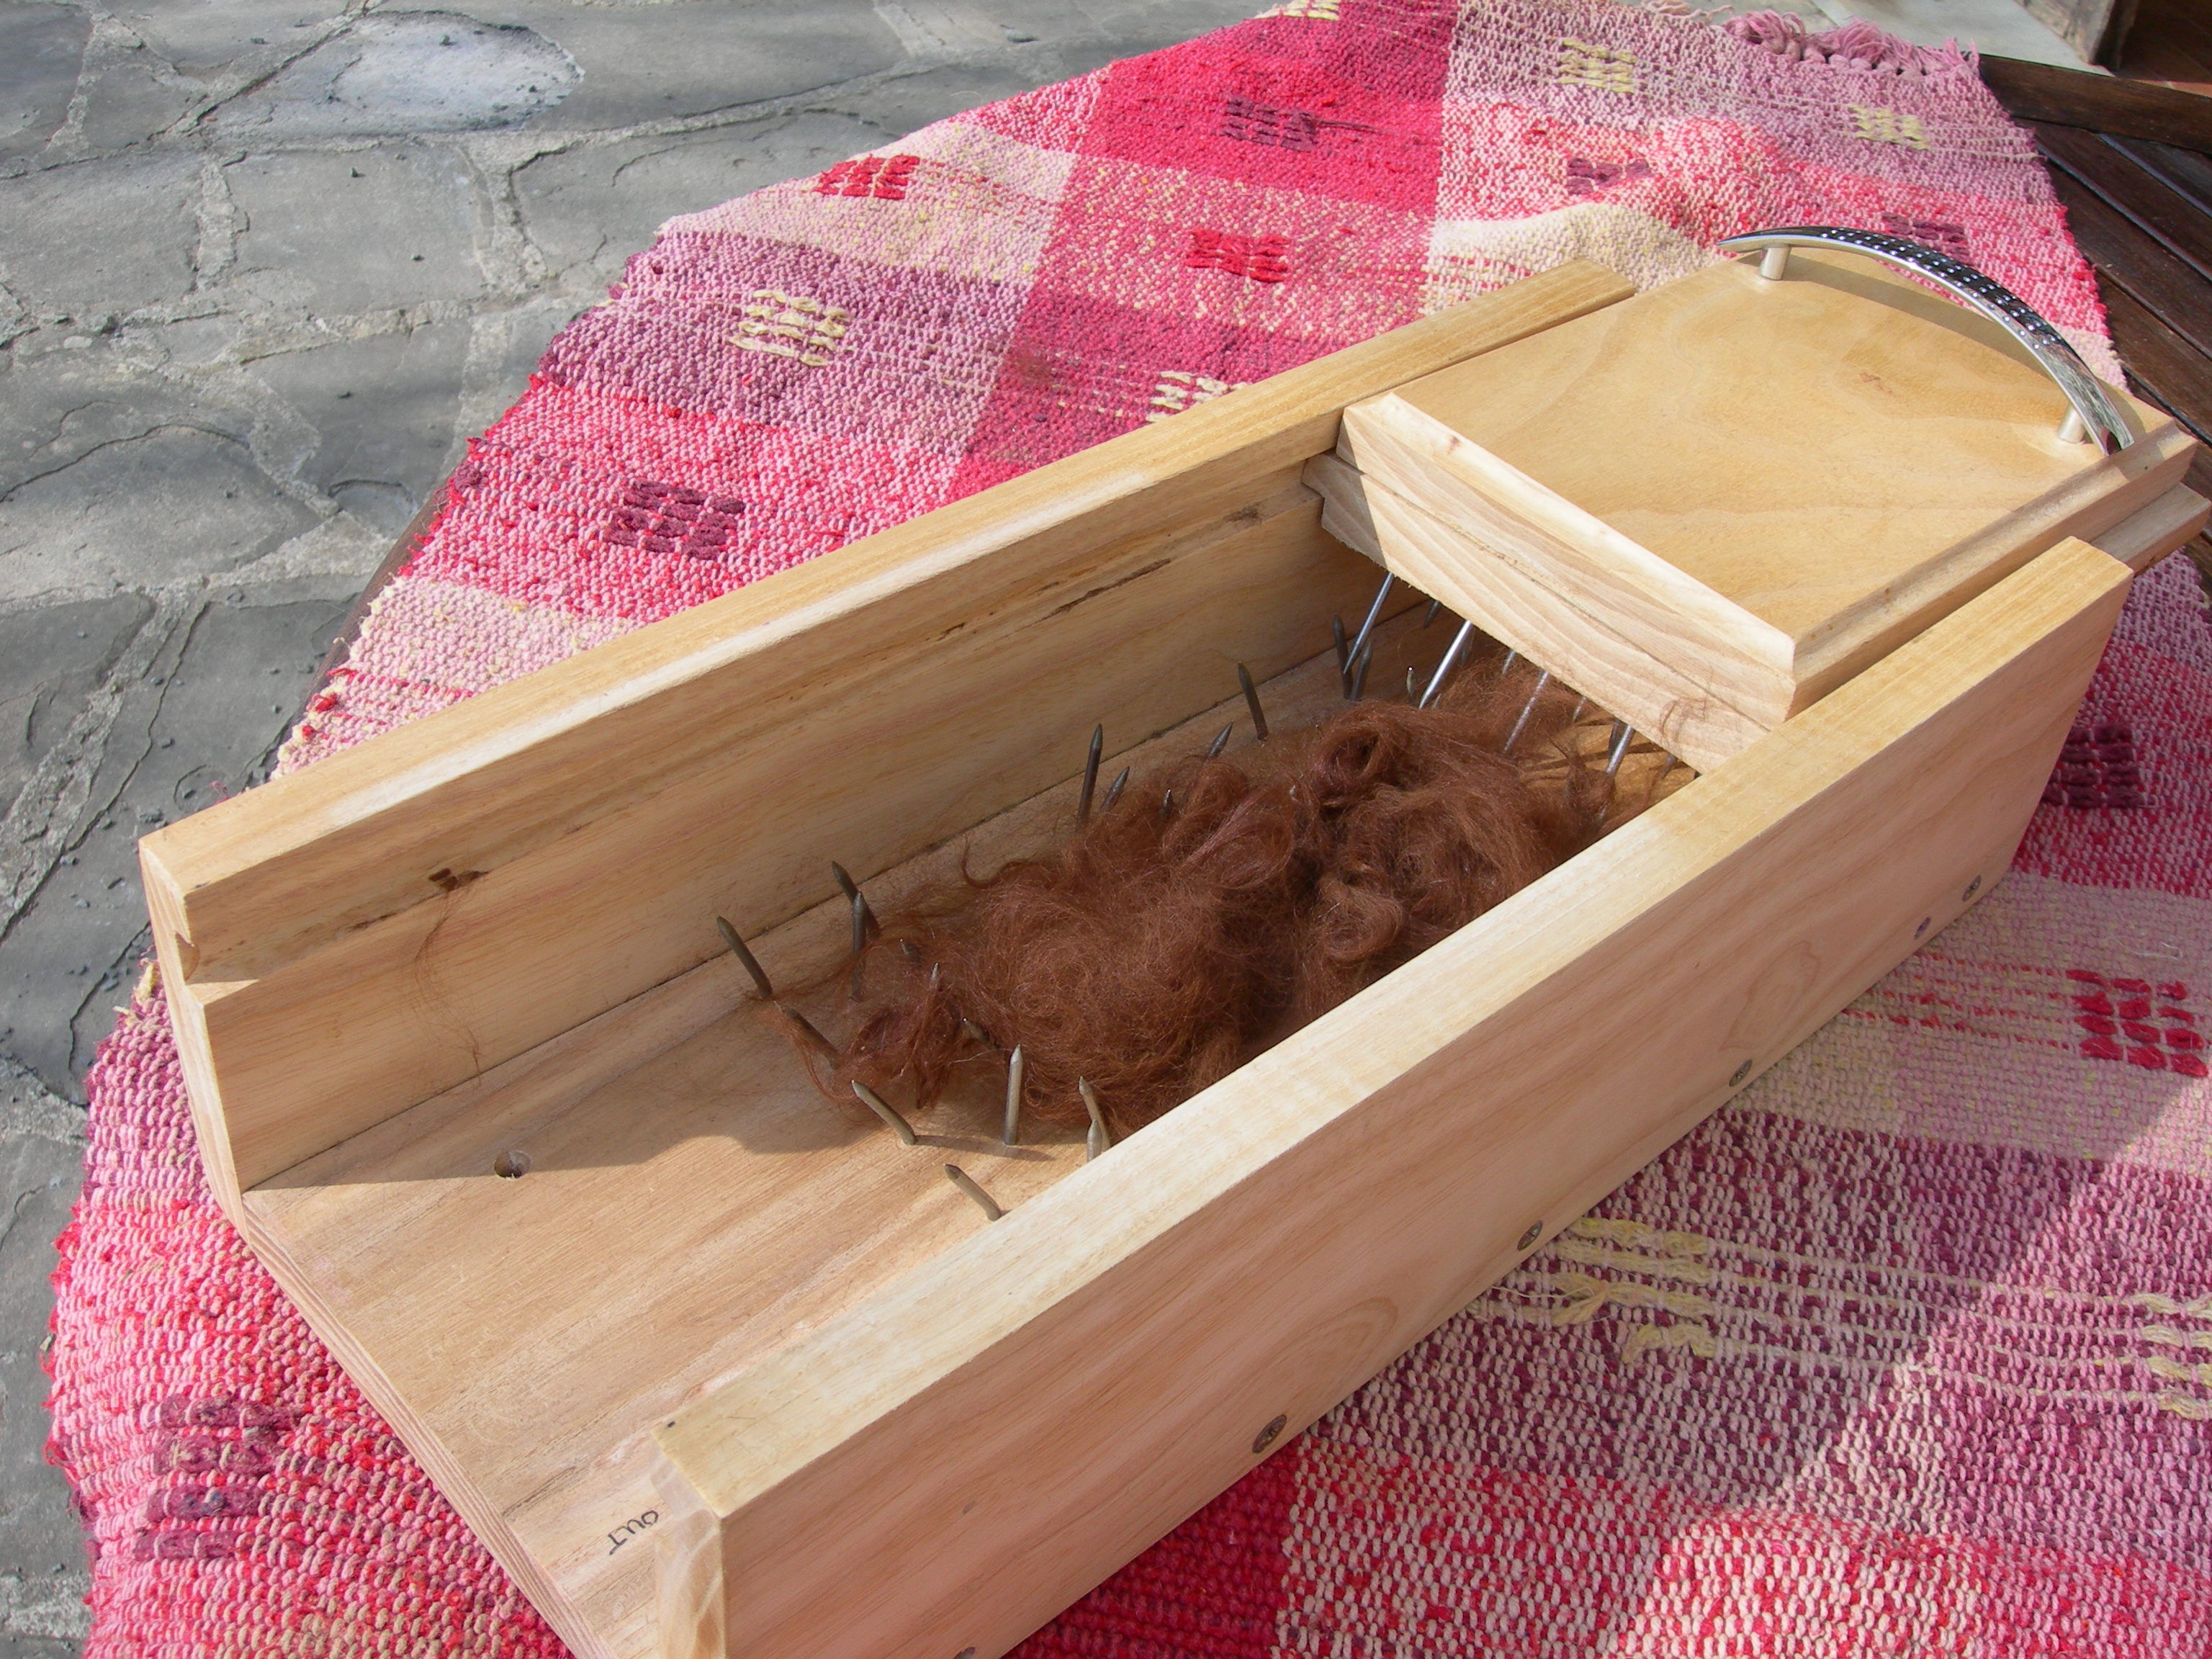
Lethal looking wool picker!
3 picking. This appears to be more of a US thing, it means opening up the washed fleece before carding. The videos I watched featured wool pickers – a wooden box with lethal-looking nails diagonally hammered into the box base and box lid which you then move backwards and forwards over small pieces of fleece. It makes it much fluffier and gives you a chance to remove knubs (more vocab – tiny lumps of wool) and other stuff you don’t really want in there. Anyway I found a picker on ebay.co.uk and bid on it successfully. After getting it couriered over it probably cost as much as a small piece of gold bullion, but at least I have one!
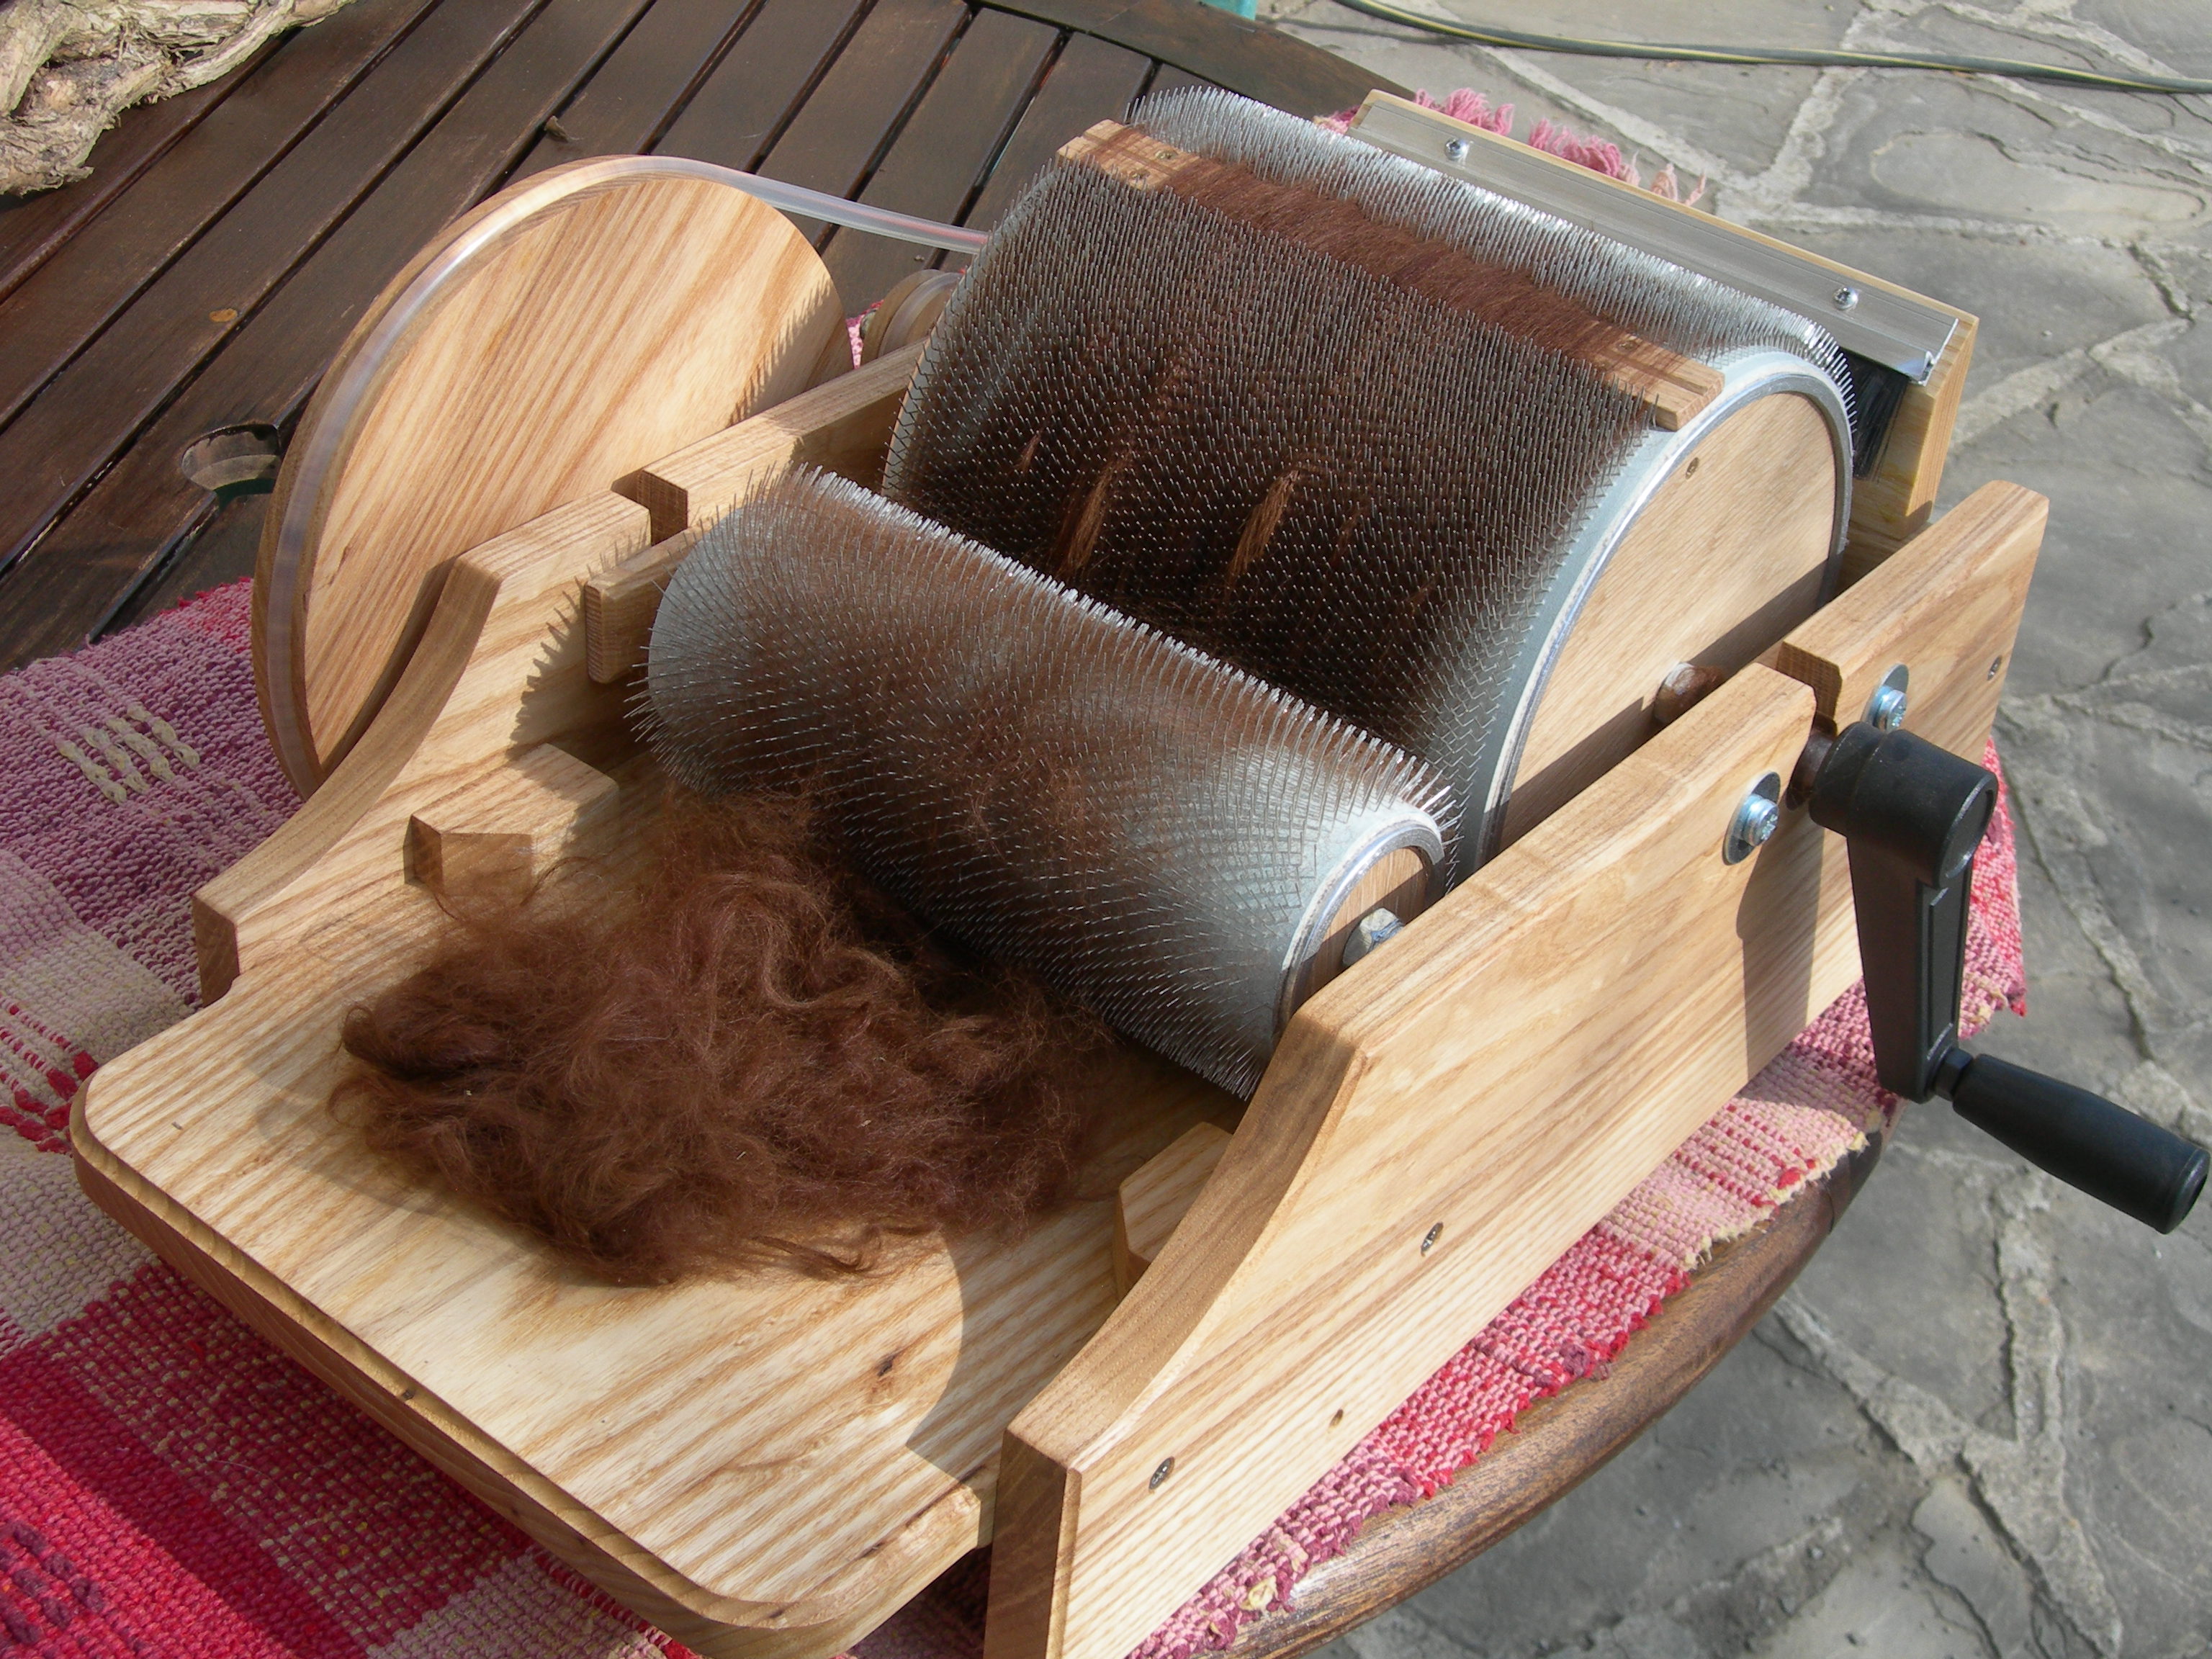
My classic drum carder
4 carding. Although you can do this by hand with things that look like a pair of wire dog brushes, and in some cases actually ARE wire dog brushes, the fast way of doing it is to use a drum carder, which is another machine with two rollers covered in tiny metal bristles and a handle. You have as much chance of finding one of these in Italy as seeing a flying alpaca so I got mine from Paul Brittain at www.classiccarder.co.uk, who ise wonderful and delivers stuff extremely fast. His wife is a spinner and he makes the carders by hand from woods like beech and oak. They are quite beautiful. Anyway, you feed small amounts of the fleece in one end, turn the handle and gradually the roller gets covered in carded fleece which you then prise off the carder to give you a batt. This looks like a long wooly beard. I have discovered you need to card the fleece at least three times to get a good result.
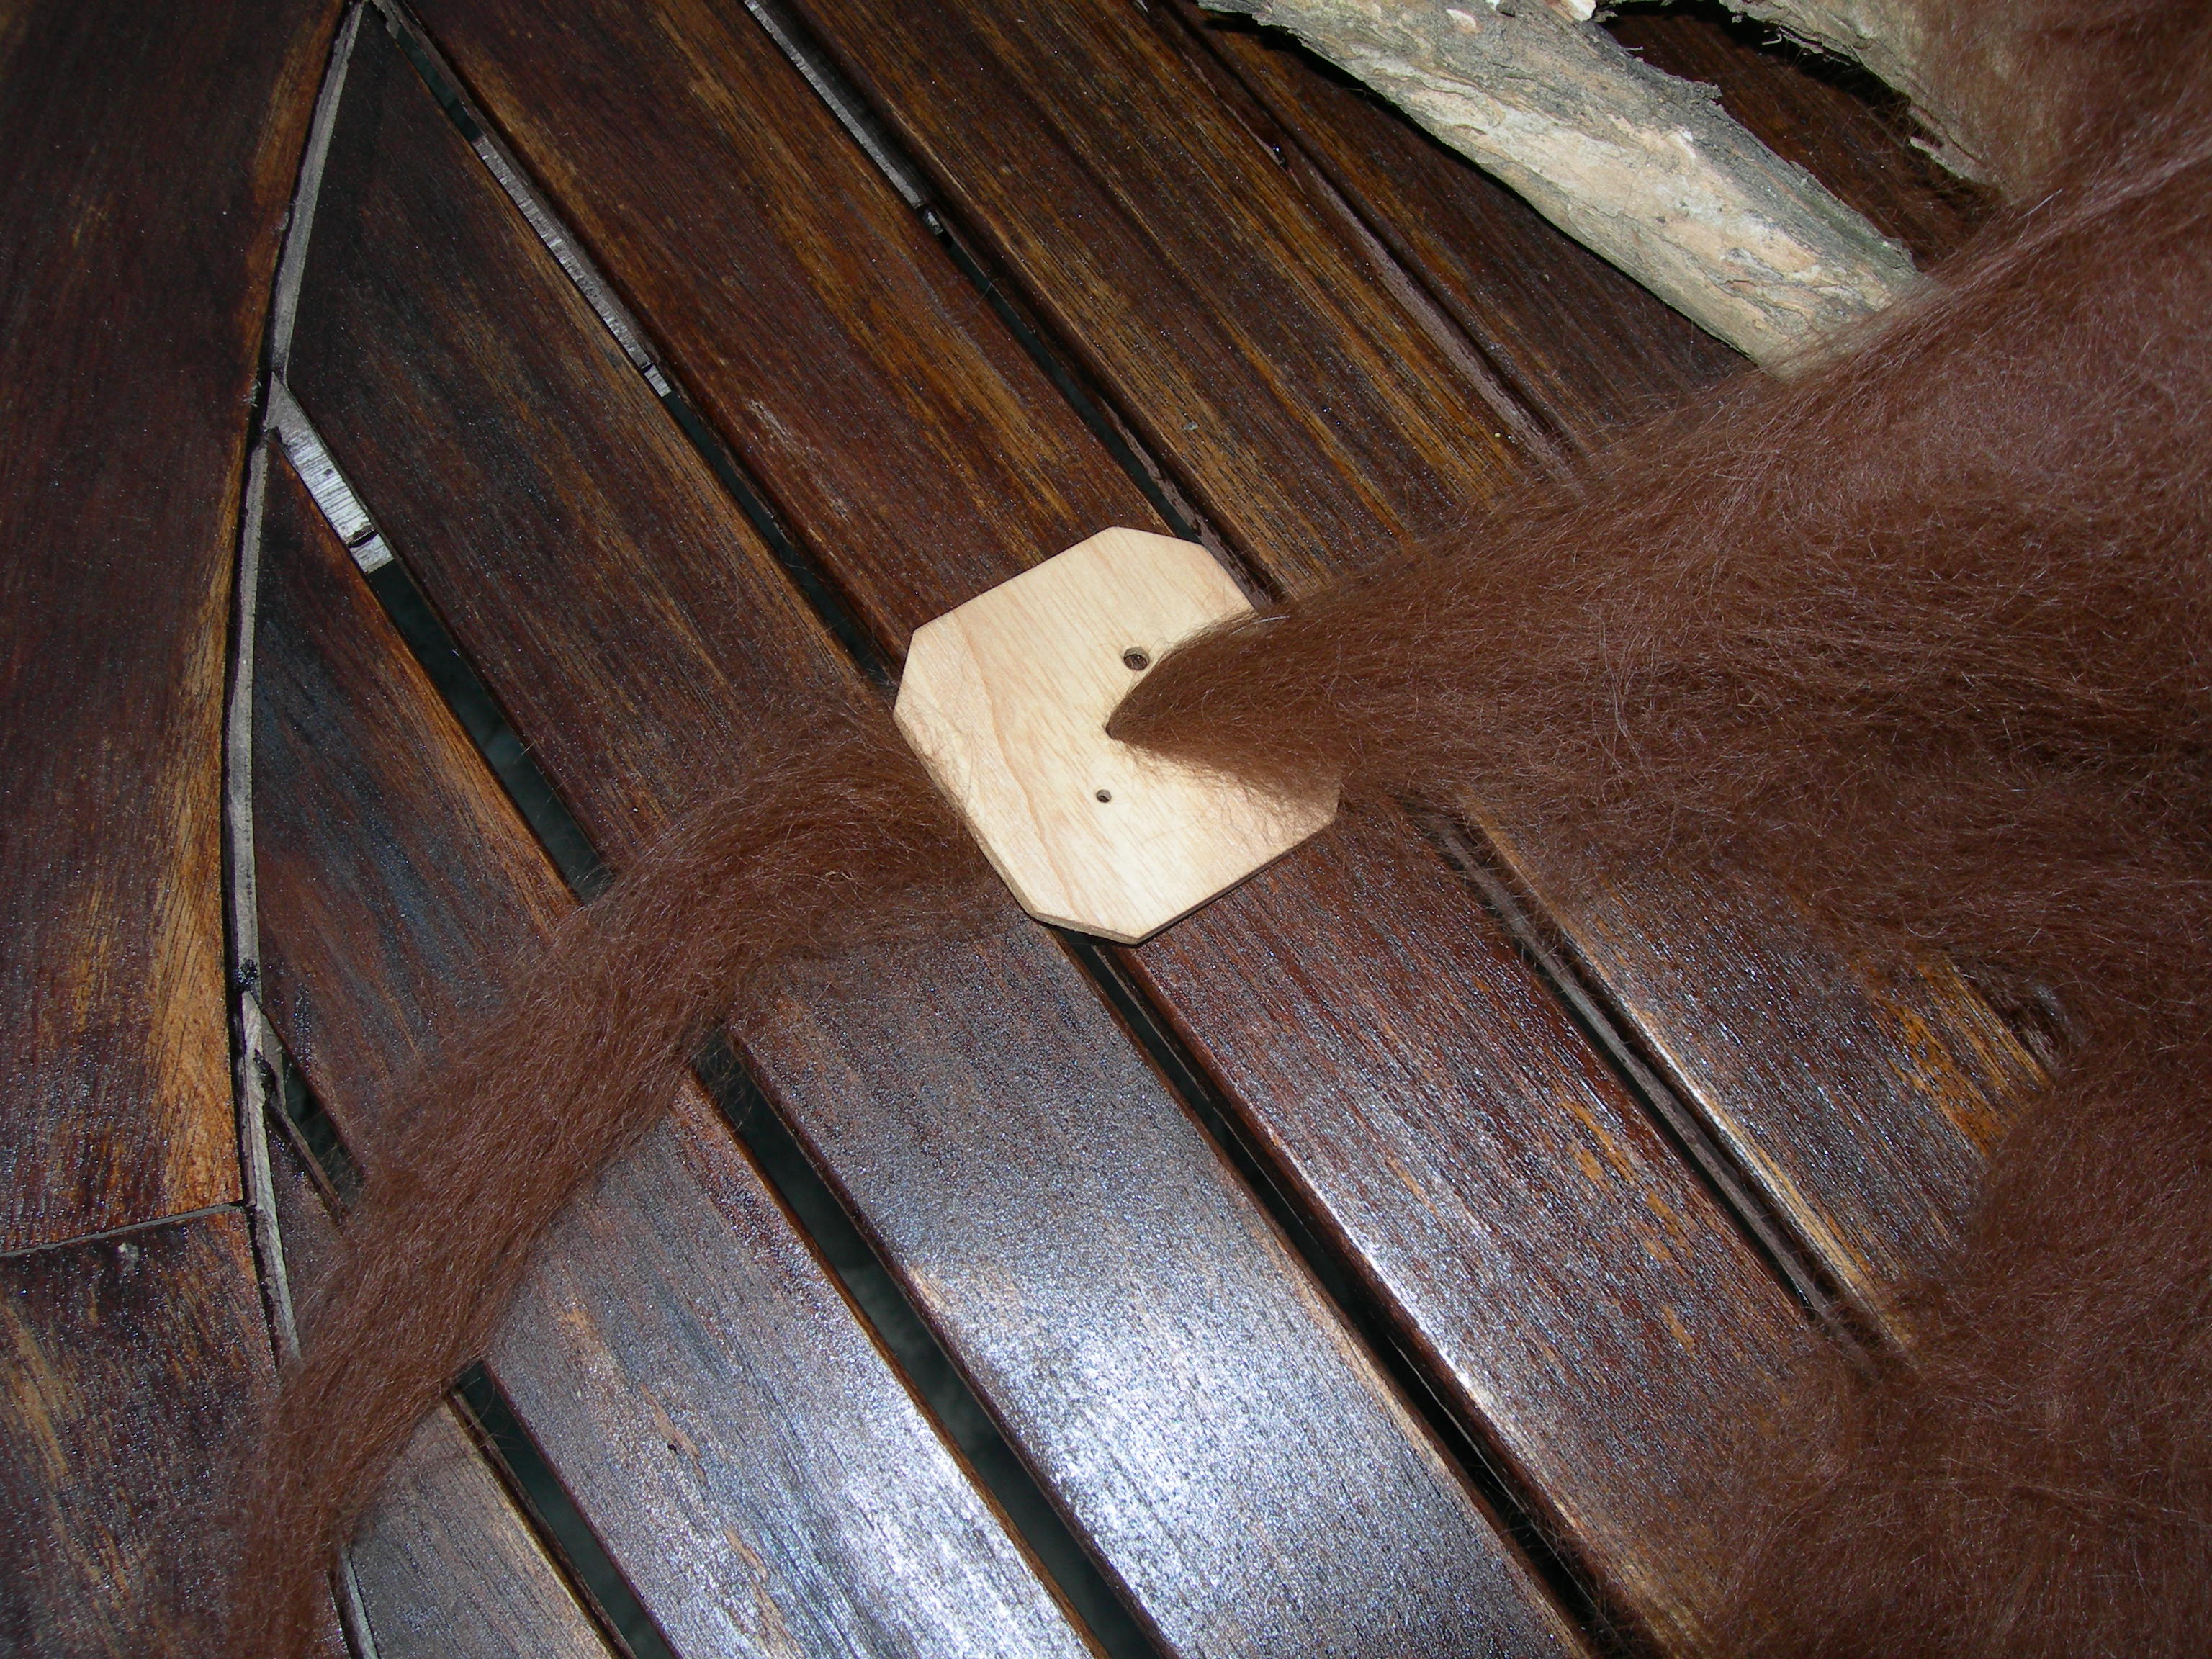
A small wooden diz which makes rovings from the batt
5 dizzing. I find it is easier to spin from thin strips of carded fleece called rovings. These are made by threading the batt through a small disc with a hole in it. It sounds impossible but it can be done! I was surprised that such a small hole produced quite thick rovings, but you can also split those.
6 pre- drafting. Once you have satisfying coils of rovings, you can pre-draft them. This means pulling them apart as much as you dare without them breaking before spinning. It’s a bit of a knack, but worth doing in advance as spinning is so much easier.

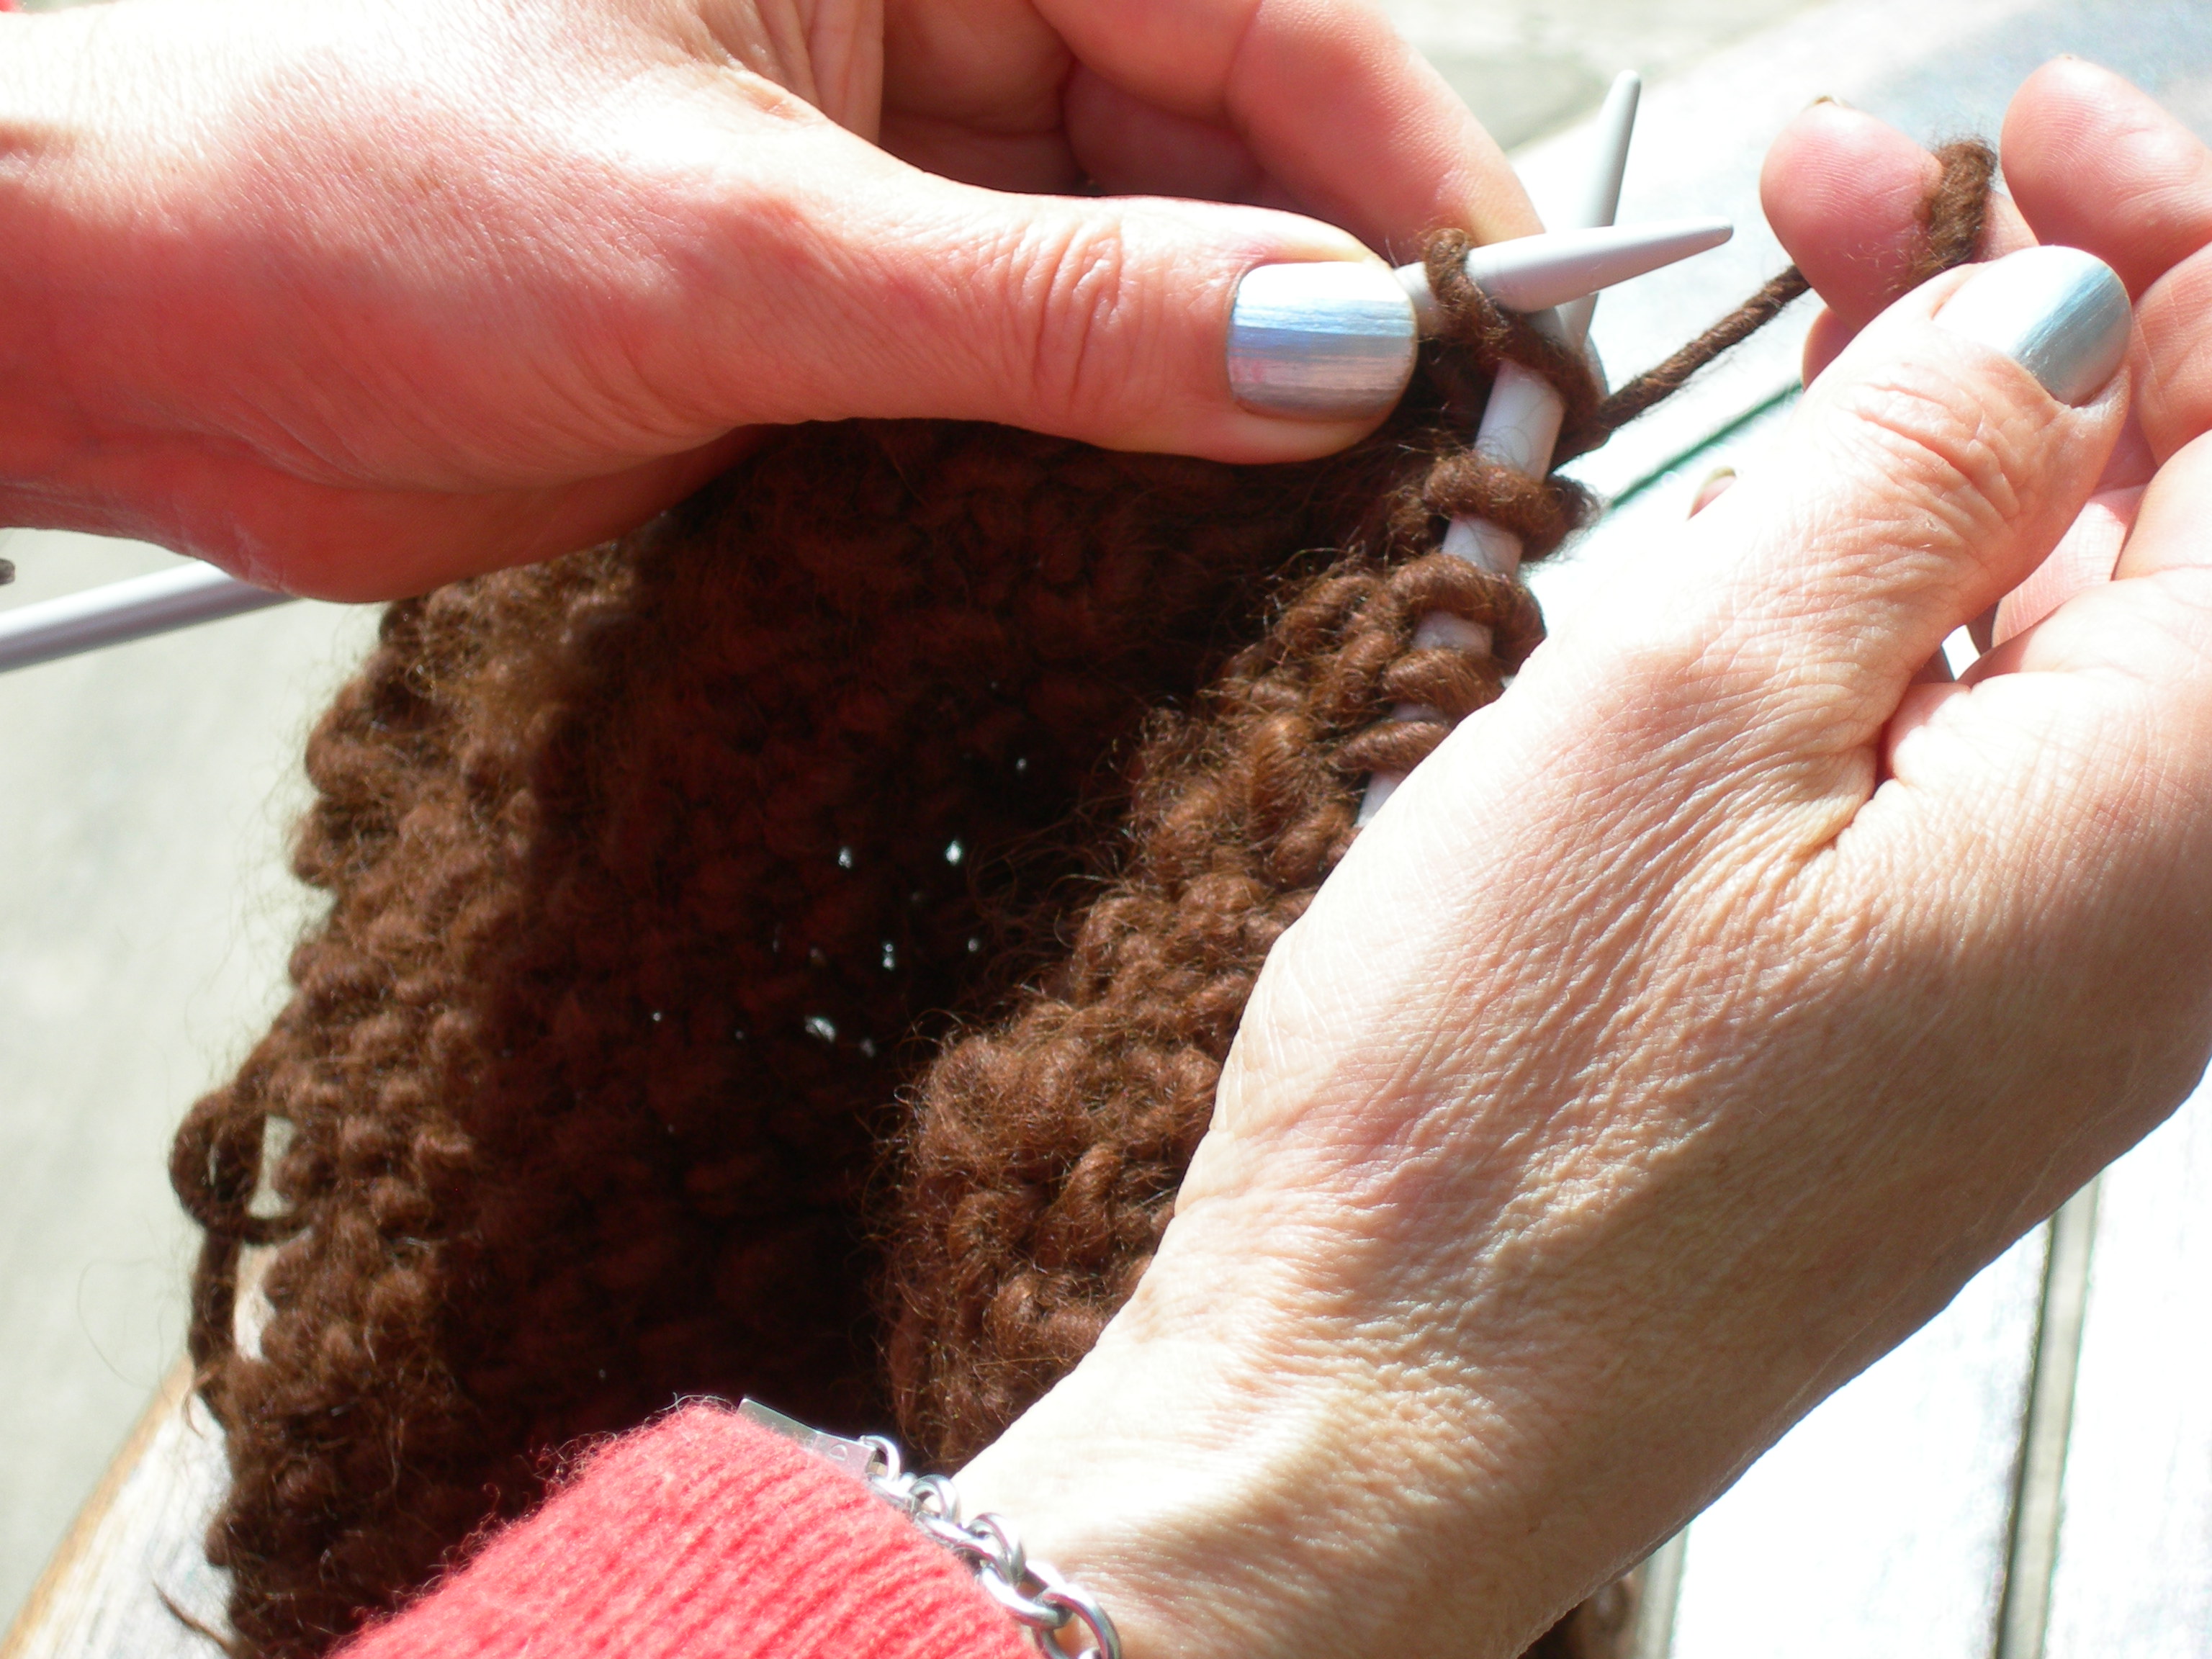
A batt and a drop spindle
7 spinning. Finally it’s time to spin. I have got a drop spindle and after watching a few trusty YouTube videos I got the hang of it. If you have a spinning wheel then that is also the next stage! I am not 100% convinced I am doing the spinning correctly, but I am getting lovely yarn, so that is the main thing. I like fat yarn, knits up faster!
8 washing yarn. You thought you had finished didn’t you? No, before knitting or crocheting you have to loop the spun yarn around a chair back, tie it in four places in a figure of eight knot and then wash it as described for the fleece earlier. This sets the twist of the yarn. After washing and air drying you can leave it in skeins or roll it into balls.
Knitting with my lovely thick suri yarn
9 knit or crochet. Yeay! At last! But the long process is so worth it. There is nothing as satisfying as making something from your own alpaca fleece!
La lana grezza di alpaca suri
L’anno scorso, dopo la tosa, finii per spedire la fibra nel Regno Unito per farla lavorare. L’operazione mi è costata molto, tra spese di spedizione e mano d’opera. Sapevo che era una follia ma non sapevo cos’altro fare.
Questa volta ho deciso di lavorare la fibra da sola e mi si è aperto tutto un nuovo mondo davanti. Ho sempre amato il lavoro a maglia, ma produrre la lana direttamente dalla fibra grezza è davvero una sensazione straordinaria. Inoltre, filare con il fuso è un qualcosa di veramente speciale, che credo ti rimetta in contatto con la parte più ancestrale del tuo essere.
Lavorare la fibra degli alpaca è una procedura piuttosto lunga e complicata. Io ho imparato da sola utilizzando la lana di suri, che poi ho appreso essere la più difficile da trattare, cavandomela però piuttosto bene. Adesso proverò con la huacaya, quindi vi farò sapere se ci sono differenze.
Dalla fibra al filo
Le fasi sono queste:
1. Pulitura. La pulitura consiste nel rimuovere i peli più lunghi, ruvidi o scoloriti, i peli troppo corti perché tagliati due volte per sbaglio, sporco e parti vegetali. L’ideale è lavorare su di un tavolo apposito, che filtri lo sporco lasciandolo cadere sul terreno. Da appassionata del fai-da-te , ho pensato di farmelo da sola, utilizzando un vecchio stendibiancheria e della rete metallica. Lo stendibiancheria ha delle gambe un po’ traballanti quindi il piano è leggermente inclinato, ma OK, il prezzo è giusto!
2. Lavaggio. Dopo aver guardato diversi video su YouTube (sì, ci sono anche video su come lavare la lana di alpaca) ho comprato su ebay un sacchetto a rete per il lavaggio di capi intimi. L’idea è di metterci dentro la fibra, riempire una vaschetta con acqua calda e detergente, immergere il sacchetto per trenta minuti senza smuoverlo troppo per non farlo infeltrire, risciacquare due volte immergendolo in acqua calda, asciugare facendo pressione con un asciugamano, e poi farlo asciugare all’aria, possibilmente lontano dai cani, che adorano giocare con le cose soffici e paffute. Ho perfino provato – orrore! – a lavare la fibra in lavatrice usando il ciclo lavaggio a mano, ed è andata bene! Secondo me molta gente è un po’ paranoica e si fa troppi problemi per paura di infeltrire. Finora a me non è successo.
Wool picker -cassa di legno con dei chiodi dall’aspetto letale
3. Apertura. Questa fase sembra essere più comune negli Stati Uniti: si tratta di districare la lana per prepararla alla cardatura. Nei video che ho trovato si usava un apposito strumento, una sorta di cassa di legno con dei chiodi dall’aspetto letale piantati obliquamente sulla base e con un coperchio che si muove avanti e indietro dopo aver introdotto piccole quantità di fibra. In questo modo la fibra si fa molto più soffice ed è anche possibile rimuovere piccoli grumi di lana e altra roba indesiderata. Ne ho trovato uno su ebay.co.uk e ho vinto l’asta. Dopo essermelo fatto spedire via corriere, il costo totale è finito per essere praticamente lo stesso di un piccolo lingotto d’oro, ma almeno adesso ce l’ho!
La mia cardatrice a tamburo
4. Cardatura. Anche se questa operazione si può eseguire a mano usando degli attrezzi che sembrano un paio di spazzole in metallo per cani – e che in certi casi sono spazzole in metallo per cani – il modo più veloce per farlo è di usare una cardatrice a tamburo, un altra macchina specifica che ha una manopola e due rulli ricoperti di piccole setole in metallo. In Italia è più facile vedere un alpaca spiccare il volo piuttosto che trovare uno di questi aggeggi, quindi l’ho comprato da Paul Brittain, su www.classiccarder.co.uk, che offre un ottimo servizio, con consegne velocissime. Sua moglie è una filatrice e lui realizza le cardatrici a mano, usando legno di faggio o quercia. Sono veramente belli. Ad ogni modo, si inserisce un po’ di fibra a un’estremità, si comincia a girare la manopola, e gradualmente i rulli cominceranno a ricoprirsi di lana cardata, che poi va rimossa per ottenere dell’ovatta, che prende l’aspetto di una lunga barba lanosa. Ho scoperto che per ottenere risultati soddisfacenti è necessario ripetere la cardatura almeno tre volte.
Una “diz” : un disco con un piccolo foro al centro per fare sottili strisci di fibra cardata
5. Dizzing. Per me è più facile filare a partire da sottili strisce di fibra cardata, ciò che chiamiamo filato. Per fare il filato si deve far passare l’ovatta attraverso un disco con un piccolo foro al centro. Sembra impossibile, ma si può fare! Mi ha sorpreso come un foro così piccolo possa produrre un filato così spesso, che però si può anche dividere.
6. Stiratura. Una volte ottenuti dei bei rotoli, prima della filatura vera e propria, è possibile distendere e tirare il filato il più possibile stando attenti a non farlo spezzare. E’ soprattutto questione di farci la mano, ma vale la pena farlo per rendere la filatura molto più facile.
La lana cardata e un fuso a gravità.
7. Filatura. Finalmente è arrivato il momento di filare. Dopo aver guardato qualche video su YouTube, ho imparato a usare il mio fuso a gravità. Se avete anche un filatoio a ruota, quella è la fase successiva! Non sono sicura al 100% che la mia filatura sia del tutto corretta, ma sto ottenendo dell’ottimo filo, che è quello che conta. Mi piace il filo bello spesso, si lavora molto più velocemente!
8. Lavaggio del filo. Pensavate di aver finito, vero? Eh no, prima di usare ferri o uncinetto si deve prendere il filo e avvolgerlo intorno allo schienale di una sedia, legarlo in quattro punti con nodo savoia e poi lavarlo come spiegato in precedenza per il lavaggio della fibra. In questo modo l’attorcigliamento del filo si stabilizza. Dopo averlo lavato e asciugato all’aperto, lo si può lasciare in matasse o arrotolarlo in gomitoli.
Finalmente: usando il mio filo bello spesso di lana suri
9. Ferri e uncinetto. Finalmente! Ma pur con tutto il tempo che ci vuole ne vale veramente la pena. Non c’è soddisfazione più grande che creare un capo con la lana dei tuoi alpaca!